Continuous Integration/Delivery with VSTS to Azure

Continuous Integration (CI)
Software development practice where developers regularly merge their code changes into a central repository, after which automated builds and tests are run.
The key goals of continuous integration are to find and address bugs quicker and reduce the time it takes to validate and release new software updates.
Benefits of CI
- No more long and tense integrations
- Increase visibility enabling greater communication
- Catch issues early to make sure what you commited is perfectly fine
- Spend less time debugging since you have visibility of the tasks which are pushed to the build
- Reduce integration problems allowing you to deliver software more rapidly
Continuous Delivery (CD)
Continuous Deployment is closely related to Continuous Integration and refers to the release into production or other stagings of software that passes the automated tests and build.
"Essentially, it is the practice of releasing every good build to users”, explains Jez Humble, author of Continuous Delivery.
With more often low-risk releases, you can quickly adapt to business requirements and user needs.
VSTS (visual studio team service)
VSTS is a full continuous delivery pipeline. It is a cloud platform with so many features to use and integrate. For this article we only use CI/CD AND git.
why you need Continious Integration
Integration: (Automated build) you are not the only dev in the team and there are many environments (UAT-Staging-Prod) you need to release your code.
Your build might work on the your machine but since you have integration, everything might break in the production.
In order to activate CI, you need to have a central repository along with automated build and automated tests.
Integration with mainline code should be done more often so the branches are as close as possible to the mainline
Fancy trying VSTS continious integration and release?
If you want to start off, you need to take below steps.
Setup the account
you need to have either a Microsoft account or ADFS account.
Create a a project
You need to create a project which has all codes, permissions,...
It is recommended to Use Git Credential Managers to authenticate to VSTS otherwise use you SSH.
Integrate VSTS to the source code
You can initiate a new repo with VSTS or connect it to the existing repo in your client.
Once you set it up, each Push leads to run the build (provided that you enabled Continious Integration)
Configure the trigers
You can schedule the build or run it automatically once any code pushed to the repo.
Create a build definition
Open your project, select BUILD AND RELEASE MENU=> BUILD
Now we need to define a definition for our build which is all the steps we need to build our app.
Multiple builds can be queued and once you get to the release stage you can pick which build artifact you are planning to use.
Create a build definition
Before you can start this step, you need to provide a platform to host your application and deploy you artifact to. You can go through my article Deploy Nodejs app in Azure AppService
Once you get the Azure App service ready, you can describe your Release definition.
This definition is triggered automatically by a successful build of your application or you can run it manually.
You need to take two essential steps:
1- Introduce the build package which is going to be deployed
2- Connect your project to a Hosting environment (ex- Azure App Service)
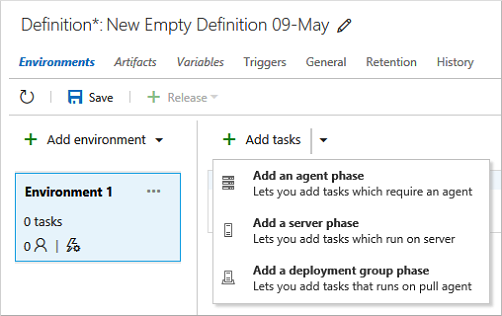
All your steps is contained in the Pipeline since you can pass the same artifact to different environments. You can also identify how each environment should be triggered. For instance production can be triggered after uat is triggered.
Reference
Connect Azure to VSTS to deployment continously
Pluralsight: Deploy NodeJs through VSTS
Microsoft VSTS tutorial